调研环境说明
etcd –version
etcd Version: 3.5.1
Git SHA: d42e8589e
Go Version: go1.17.2
Go OS/Arch: darwin/amd64
参数说明
启动参数
1
2
3
4
5
6
7
8
9
10
11
12
13
14
| --name etcd-1 // 节点名称
--data-dir /Users/noogel/Debug/data/etcd1 // 数据目录
--initial-advertise-peer-urls http://127.0.0.1:238
--listen-peer-urls http://127.0.0.1:2381
--listen-client-urls http://127.0.0.1:2379
--advertise-client-urls http://127.0.0.1:2379
--initial-cluster-token etcd-lock-cluster-1 // 集群 token
--initial-cluster etcd-1=http://127.0.0.1:2381,etcd-2=http://127.0.0.1:2382,etcd-3=http://127.0.0.1:2383 // 集群节点信息
--initial-cluster-state new // 初始化的集群状态
--heartbeat-interval 1000 // 心跳间隔
--auto-compaction-retention 1 // 开启自动压缩,间隔 1h 执行
--auto-compaction-mode periodic
--quota-backend-bytes 8589934592 // 后端存储大小
--election-timeout 5000 // 选举超时时间
|
关于自动压缩
https://etcd.io/docs/v3.4/op-guide/maintenance/#defragmentation
--auto-compaction-mode=revision --auto-compaction-retention=1000 每5分钟自动压缩”latest revision” - 1000--auto-compaction-mode=periodic --auto-compaction-retention=12h 每1小时自动压缩并保留12小时窗口。
自动压缩碎片后还需要单独再清理占用的系统存储空间,etcdctl defrag。
最佳实践
- heartbeat timeout 默认为 100ms,推荐配置为 1s;
- election timeout 默认为 1000ms,推荐为 5s(election timeout >= 5 * heartbeat timeout);
- quota-backend-bytes 默认为 2G(最大值8G),推荐根据集群容量预估调整;
- 配置 auto-compaction-retention=1 和 auto-compaction-mode=periodic 参数,定期压缩历史数据;
- 推荐通过 cronjob 定期执行 etcdctl defrag(如果 defrag 执行时间 > election timeout,则集群会进入重新选主模式)
环境模拟
端口映射
单机环境写集群搭建,以下是端口映射
etcd1 2379 -> 2391 2380 -> 2381
etcd2 2379 -> 2392 2380 -> 2382
etcd3 2379 -> 2393 2380 -> 2383
启动命令
1
2
3
4
5
| ETCDCTL_API=3 etcd --name etcd-1 --data-dir /Users/noogel/Debug/data/etcd1 --initial-advertise-peer-urls http://127.0.0.1:2381 --listen-peer-urls http://127.0.0.1:2381 --listen-client-urls http://127.0.0.1:2379 --advertise-client-urls http://127.0.0.1:2379 --initial-cluster-token etcd-lock-cluster-1 --initial-cluster etcd-1=http://127.0.0.1:2381,etcd-2=http://127.0.0.1:2382,etcd-3=http://127.0.0.1:2383 --initial-cluster-state new --heartbeat-interval 1000 --auto-compaction-mode=revision --auto-compaction-retention=1000 --quota-backend-bytes 8589934592 --election-timeout 5000 > /Users/noogel/Debug/data/etcd1/run.log 2>&1 &
ETCDCTL_API=3 etcd --name etcd-2 --data-dir /Users/noogel/Debug/data/etcd2 --initial-advertise-peer-urls http://127.0.0.1:2382 --listen-peer-urls http://127.0.0.1:2382 --listen-client-urls http://127.0.0.1:2378 --advertise-client-urls http://127.0.0.1:2378 --initial-cluster-token etcd-lock-cluster-1 --initial-cluster etcd-1=http://127.0.0.1:2381,etcd-2=http://127.0.0.1:2382,etcd-3=http://127.0.0.1:2383 --initial-cluster-state new --heartbeat-interval 1000 --auto-compaction-mode=revision --auto-compaction-retention=1000 --quota-backend-bytes 8589934592 --election-timeout 5000 > /Users/noogel/Debug/data/etcd2/run.log 2>&1 &
ETCDCTL_API=3 etcd --name etcd-3 --data-dir /Users/noogel/Debug/data/etcd3 --initial-advertise-peer-urls http://127.0.0.1:2383 --listen-peer-urls http://127.0.0.1:2383 --listen-client-urls http://127.0.0.1:2377 --advertise-client-urls http://127.0.0.1:2377 --initial-cluster-token etcd-lock-cluster-1 --initial-cluster etcd-1=http://127.0.0.1:2381,etcd-2=http://127.0.0.1:2382,etcd-3=http://127.0.0.1:2383 --initial-cluster-state new --heartbeat-interval 1000 --auto-compaction-mode=revision --auto-compaction-retention=1000 --quota-backend-bytes 8589934592 --election-timeout 5000 > /Users/noogel/Debug/data/etcd3/run.log 2>&1 &
|
历史数据清理命令
1
2
3
4
| rm -rf /Users/noogel/Debug/data/etcd1
rm -rf /Users/noogel/Debug/data/etcd2
rm -rf /Users/noogel/Debug/data/etcd3
mkdir etcd1 etcd2 etcd3
|
日常运维
常规命令
1
2
3
4
5
6
7
| export ETCDCTL_API=3
// 节点列表查询
etcdctl member list
// 节点状态
etcdctl --endpoints=127.0.0.1:2381,127.0.0.1:2382,127.0.0.1:2383 endpoint status --write-out=table
// 整理磁盘碎片
etcdctl --endpoints=127.0.0.1:2381,127.0.0.1:2382,127.0.0.1:2383 --user root:123456 defrag
|
开启鉴权
1
2
3
4
5
6
7
8
| // 添加 root 用户
etcdctl --endpoints=127.0.0.1:2381,127.0.0.1:2382,127.0.0.1:2383 user add root
// 授权 root 角色
etcdctl --endpoints=127.0.0.1:2381,127.0.0.1:2382,127.0.0.1:2383 user grant-role root root
// 查看用户列表
etcdctl --endpoints=127.0.0.1:2381,127.0.0.1:2382,127.0.0.1:2383 --user=root:123456 user list
// 开启鉴权
etcdctl --endpoints=127.0.0.1:2381,127.0.0.1:2382,127.0.0.1:2383 auth enable
|
生产集群节点启动方式
在生产机通过 systemd 启动。第一次启动命令--initial-cluster-state new,后续节点的增加需要修改为 --initial-cluster-state existing,不明白看节点增加部分。
修改配置
1
2
3
4
5
6
7
8
| // 编辑配置
vim /lib/systemd/system/etcd.service
// 重新加载配置
systemctl daemon-reload
// 启动服务
systemctl start etcd.service
// 查看服务状态
systemctl status etcd.service
|
问题处理
Etcd 的 compact 机制
Etcd 默认不会自动 compact,需要设置启动参数,或者通过命令进行compact,如果变更频繁建议设置,否则会导致空间和内存的浪费以及错误。Etcd v3 的默认的 backend quota 2GB,如果不 compact,boltdb 文件大小超过这个限制后,就会报错:”Error: etcdserver: mvcc: database space exceeded”,导致数据无法写入。
要从空间不足配额警报中恢复:
- Compact etcd的历史。
- 对每个etcd端点进行碎片整理。
- 解除警报。
1
2
3
4
5
6
7
8
9
10
11
| # 1、获取当前的版本
$ rev=$(ETCDCTL_API=3 etcdctl --endpoints=:2379 endpoint status --write-out="json" | egrep -o '"revision":[0-9]*' | egrep -o '[0-9].*')
# 2、压缩当前版本之前的所有记录
$ ETCDCTL_API=3 etcdctl compact $rev
compacted revision 1516
# 3、清理多余的碎片空间
$ ETCDCTL_API=3 etcdctl defrag
Finished defragmenting etcd member[127.0.0.1:2381]
# 4、解除警告
$ ETCDCTL_API=3 etcdctl alarm disarm
memberID:13803658152347727308 alarm:NOSPACE
|
需要注意的是整理碎片释放空间,要一个一个节点执行,因为在执行期间节点是无响应的,直到处理完。防止因为全部节点无响应导致的服务不可用
碎片整理
压缩key空间后,会出现内部碎片,这些压缩出来的碎片空间可以被etcd使用,但是不会真正的释放物理空间,需要进行碎片整理,如:
1
2
| $ etcdctl defrag
Finished defragmenting etcd member[127.0.0.1:2379]以上指令只作用于当前所在的主机,不会在集群
|
环境中复刻。可以使用–cluster标记指定所有成员以自动查找所有集群成员。如:
1
2
3
4
| $ etcdctl defrag --cluster
Finished defragmenting etcd member[http://127.0.0.1:2381]
Finished defragmenting etcd member[http://127.0.0.1:2382]
Finished defragmenting etcd member[http://127.0.0.1:2383]
|
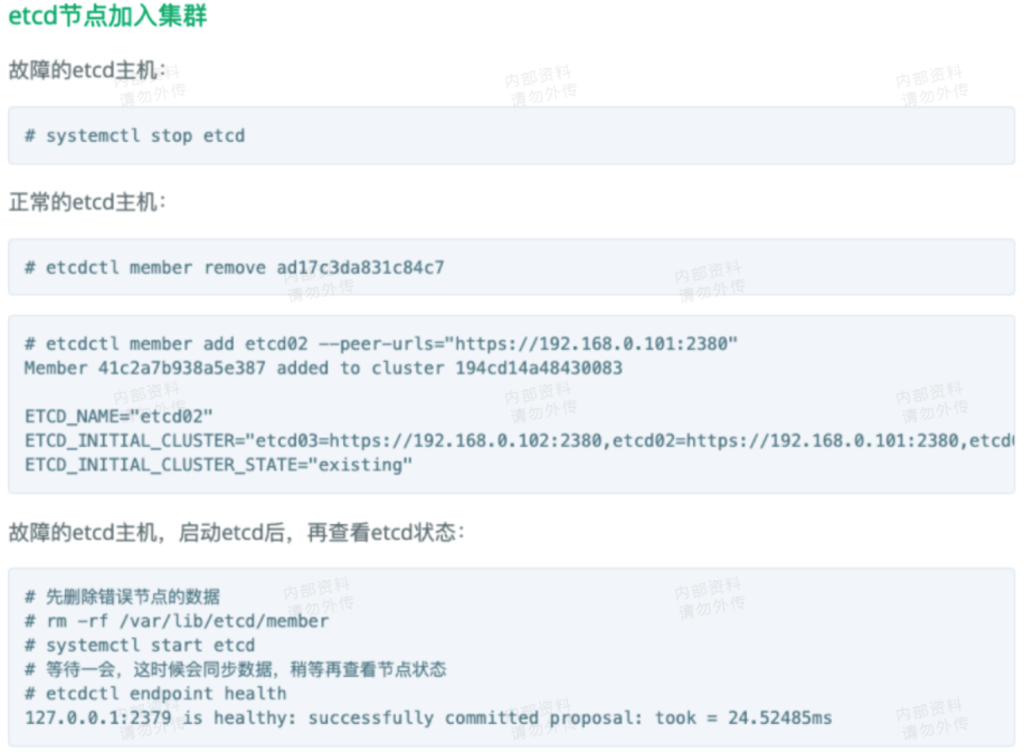
节点增减
1
2
3
4
5
6
7
8
| # 查看成员信息
ETCDCTL_API=3 etcdctl member list
# 移除节点
ETCDCTL_API=3 etcdctl member remove wallet0x
# 添加节点
ETCDCTL_API=3 etcdctl member add wallet0x --peer-urls="http://10.137.158.119:2380"
# 最后再启动服务
# 其中启动命令 --initial-cluster-state 需要设置为 existing。
|
需要先移除故障节点成员,再添加进去成员列表。然后清理掉故障节点的工作目录内容,之后再启动服务,启动后服务会自动同步数据。
其中启动命令需要设置为 --initial-cluster-state existing。
参考链接
http://www.zhaowenyu.com/etcd-doc/ops/data-space-manage.html
https://xieys.club/etcd-backup-restore
https://www.cnblogs.com/lowezheng/p/10307592.html
https://bbotte.github.io/service_config/etcd-cluster-troubleshooting.html
https://www.mytecdb.com/blogDetail.php?id=211
https://www.cnblogs.com/tencent-cloud-native/p/14893209.html
http://www.dockone.io/article/2955
https://mytecdb.com/blogDetail.php?id=199